

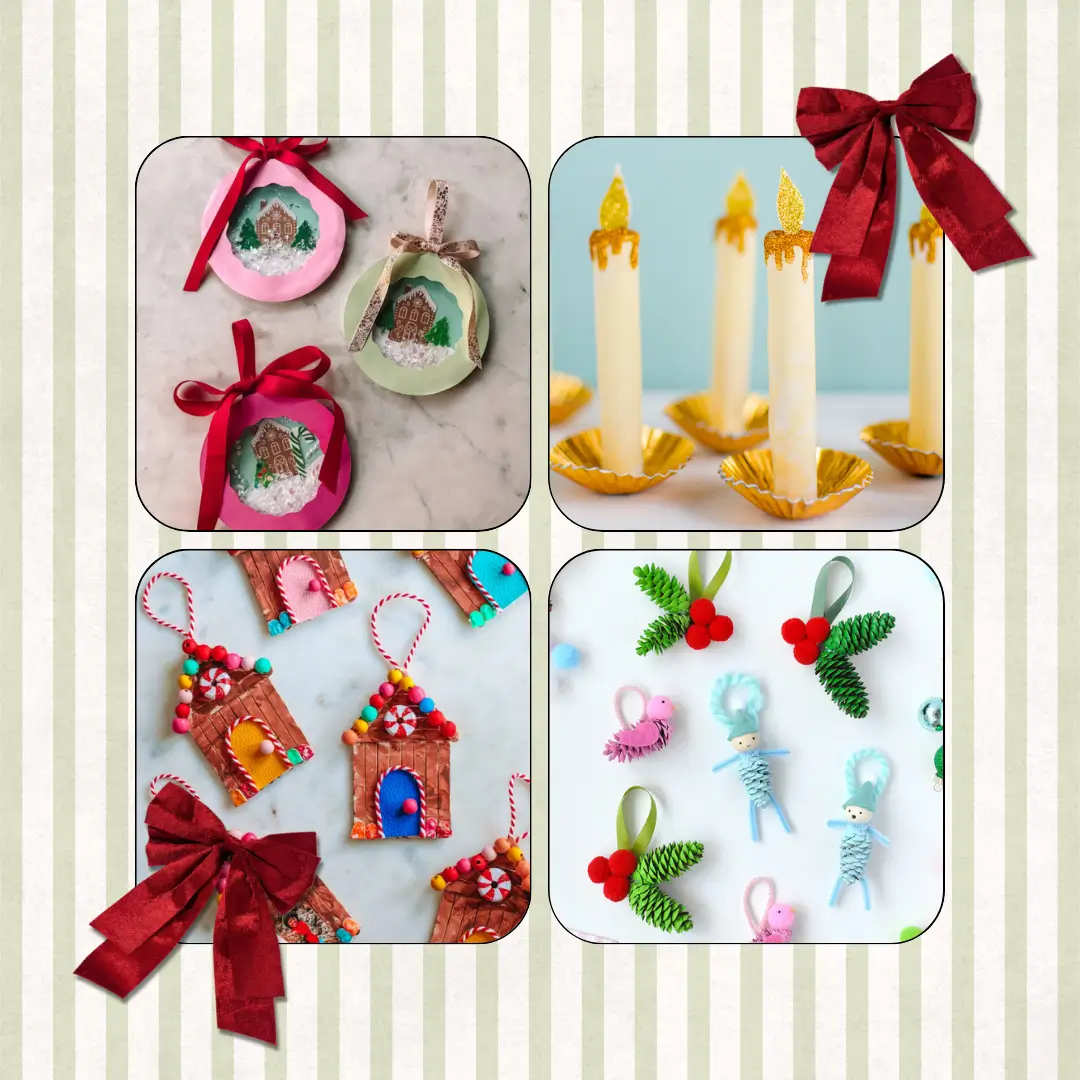
It is August. I know.
But if you want to sell handmade ornaments this Christmas, this is roughly the last comfortable time to start, and I would rather be the annoying one telling you now than the sympathetic one telling you in November.
Here’s why ornaments, specifically. Materials cost pennies. Most designs take under twenty minutes. They weigh almost nothing to ship, which matters more than you’d think.
And people buy them in threes, because nobody has ever put a single ornament on a tree and felt satisfied.
PIN FOR LATER 📌
Compare that to hand-knitting a blanket for forty hours and selling it for $90… yeah.
There’s a reason so many handmade shops make most of their year between October and mid-December.
The catch is that a cute ornament idea is maybe a third of the job.
The rest is pricing it so you’re not quietly funding a stranger’s Christmas, listing early enough that anyone can find you, and not batch-producing 200 of something you are not legally allowed to sell. (Whole section on that one. Genuinely, read it.)
Best Christmas Ornaments to Make and Sell
1. DIY Velvet-Inspired Ornaments
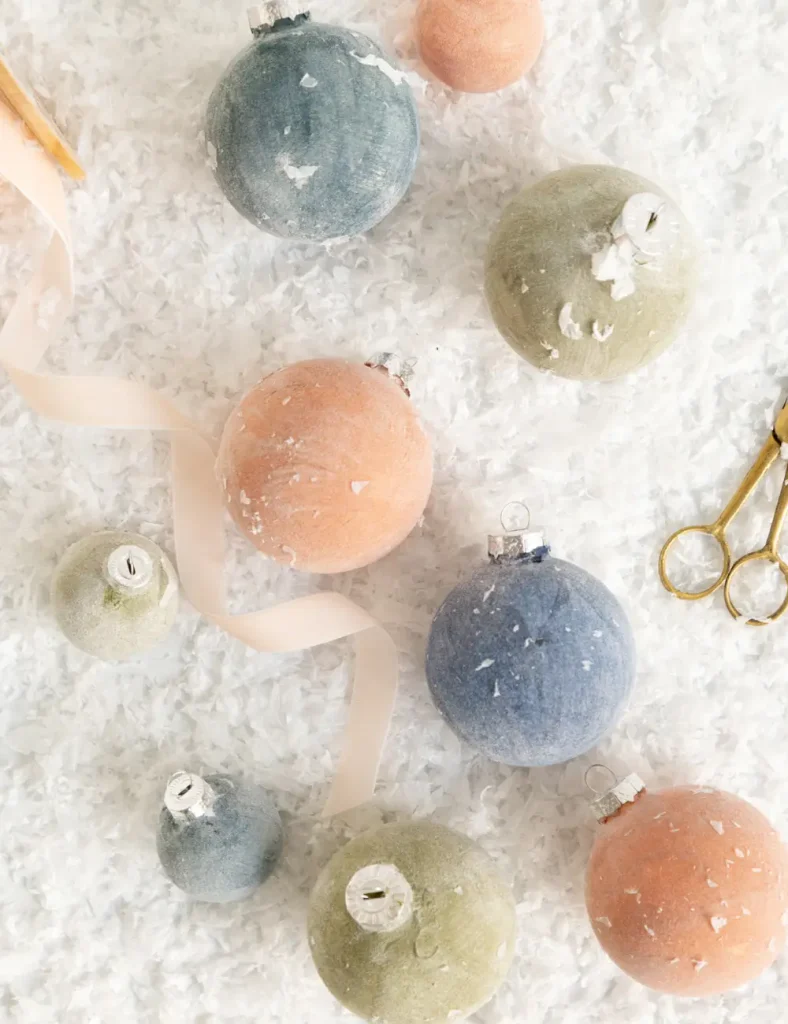
- Materials: clear baubles, acrylic paint, flocking powder, ribbon
- Time per unit: under 10 minutes, plus drying
- Differentiator: sell in color-matched sets of three rather than singles
Cheap to make, but expensive-looking.
You paint a clear bauble in acrylic and coat it while the paint is wet, and it comes out looking like the Studio McGee velvet ornaments that sell out at Target every year.
The viral version of this uses flour and baking soda, which is lovely on your own tree and a bad idea for anything you’re shipping, since flour attracts pests and won’t survive a week in a delivery van. Use proper flocking powder instead.
Costs slightly more, adheres properly, arrives looking the way it did when it left. Plastic baubles over glass for the same reason.
2. Retro Plastic Canvas Photo Frame Ornaments
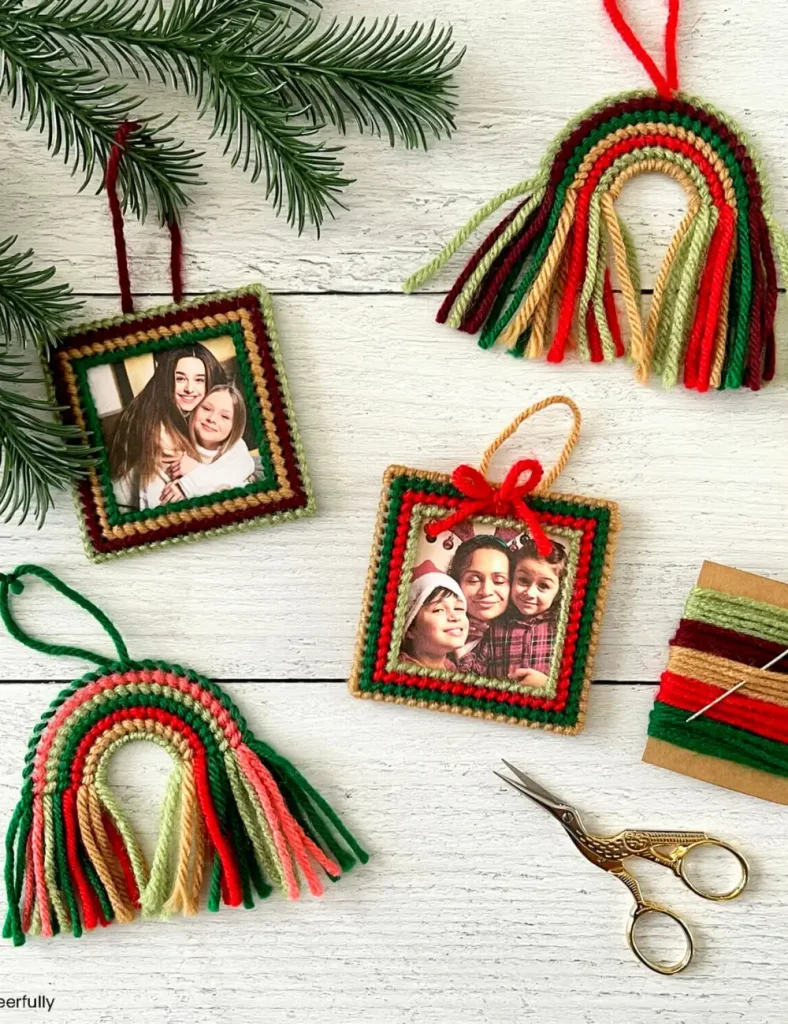
- Materials: plastic canvas sheets, yarn, size 16 canvas needle, scissors
- Time per unit: 45 to 60 minutes
- Differentiator: sell the frame empty so buyers add their own photo, no custom work for you
Plastic canvas is having a full granny-chic revival, and these hit the nostalgia note without looking like they came out of a 1987 craft cupboard. Materials cost almost nothing, which is the appeal.
The catch is time. Slanted stitches front and back, a whip stitch around the opening, then an overcast join, and you are looking at the better part of an hour per frame.
That’s a bad ratio for volume selling and a great one for a craft fair, where people can see the stitching and pay accordingly.
Here’s the clever part for a seller, though. Photo ornaments are one of the highest-demand personalization niches, and normally that means printing, proofing, and emailing back and forth with a stranger about whether their dog’s face is centered.
Sell the frame empty, and the buyer does all of that themselves. You get the keepsake premium with none of the custom-order admin.
3. Giant Finial Porch Ornaments
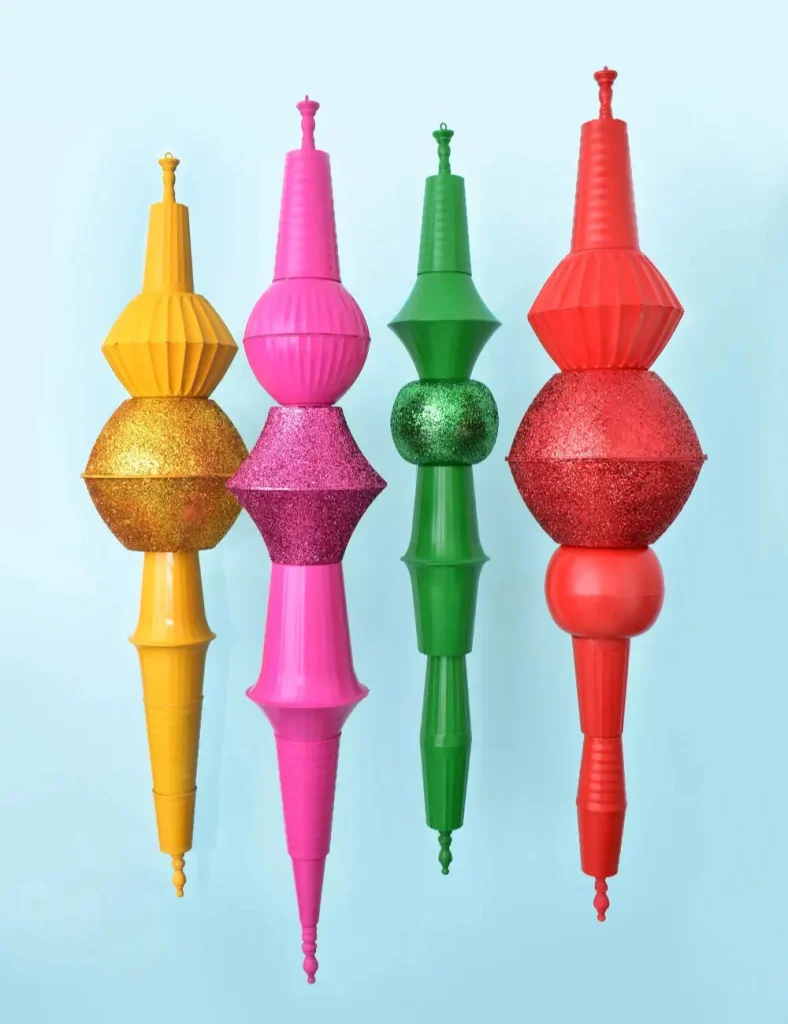
- Materials: thrifted plastic bowls and vases, spray foam insulation, 48″ wood dowel, wood candlestick, acrylic paint, plus a drill and hot glue gun
- Time per unit: around 4 hours, plus overnight for the foam to cure
- Differentiator: sell locally as porch decor at a high price point, not as a tree ornament
The one on this list you should not put on Etsy. These are four feet tall, rigid, and made from stacked thrifted bowls, so shipping is either impossible or costs more than the ornament.
What they are is excellent local stock: Facebook Marketplace, craft fairs, and commissioned porch decor, where a pair can command real money and buyers collect in person.
Thrifted materials keep costs near nothing, so the margin is good if your time is cheap. No two sets will match exactly, which rules out a repeatable listing but suits made-to-order work fine.
4. Popsicle Stick Gingerbread House Ornaments
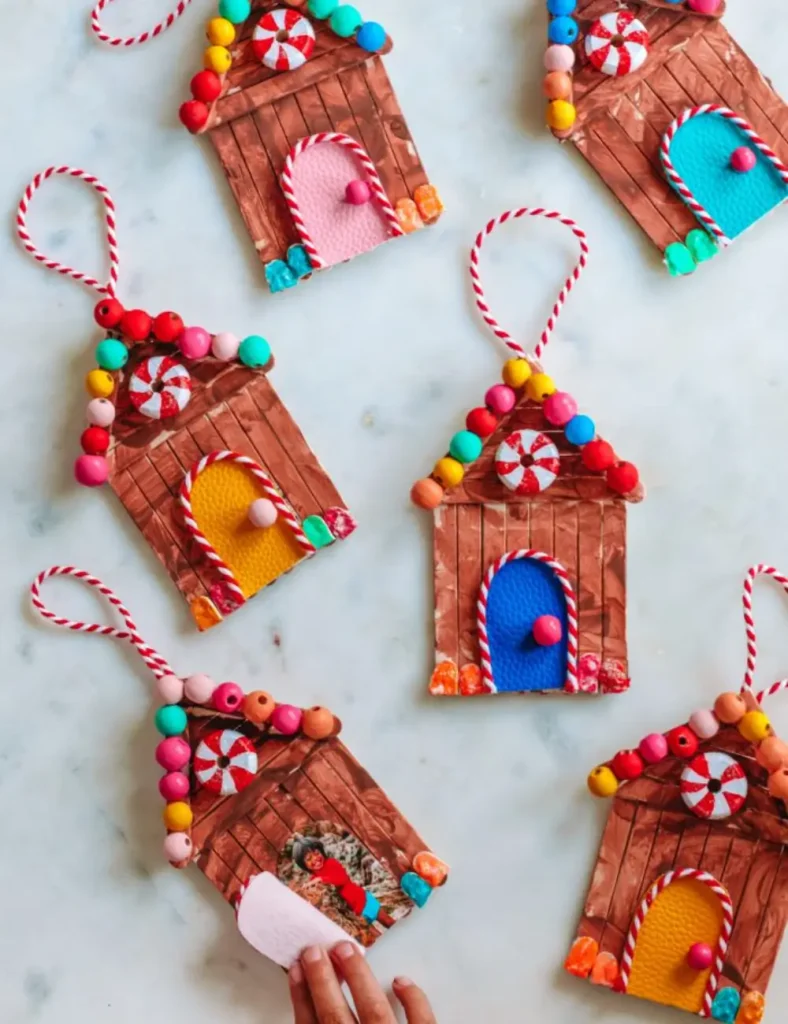
- Materials: popsicle sticks, wooden beads and discs, puffy paint, acrylic paint, glitter, felt or faux leather scraps, striped twine, hot glue
- Time per unit: 30 to 45 minutes decorated, less if you batch the components
- Differentiator: sell it as a DIY kit rather than a finished ornament
Materials here cost pennies, and the hidden door with a photo behind it is a properly charming hook.
The problem is that hand-glued popsicle sticks read as a kids’ craft, which is a hard sell as a finished product at a grown-up price. So flip it.
Pre-cut the sticks, pre-paint the bead candy, bag it with instructions, and sell a make-your-own kit instead.
Craft kits do well on Etsy, they ship flat, and you skip assembly entirely.
5. Gold Marbled Glass Baubles
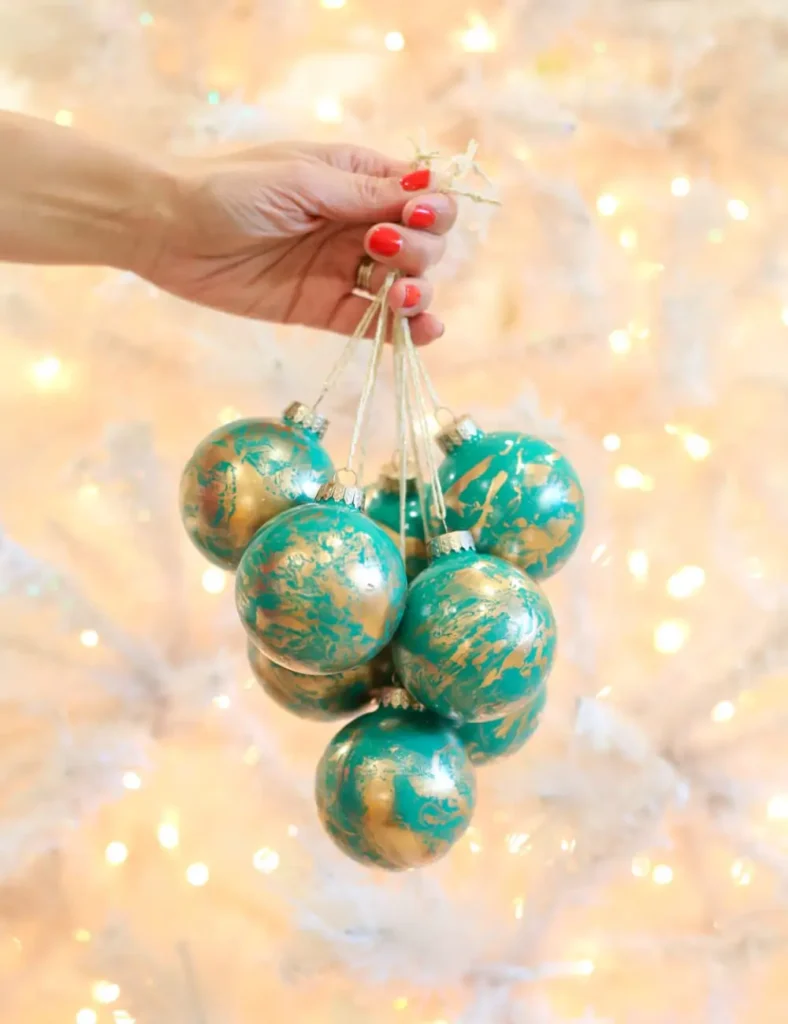
- Materials: clear glass ornaments, spray paint, liquid gilding, a disposable tub, toothpicks
- Time per unit: around 10 minutes in a batch, plus drying
- Differentiator: list them as one-of-a-kind, because no two marbles will ever match
Best value-per-minute on this list.
You spray a tray of baubles, float gilding on water, swirl it with a toothpick, and roll the ornament through, and it comes out looking like something from a design shop.
The pattern is unrepeatable, which matters practically: Etsy expects your photos to represent what arrives, so either photograph each piece individually or state plainly that every one is unique.
Glass ships badly, so budget for proper packaging or price it in.
6. Scandi Paper Clip-On Candles
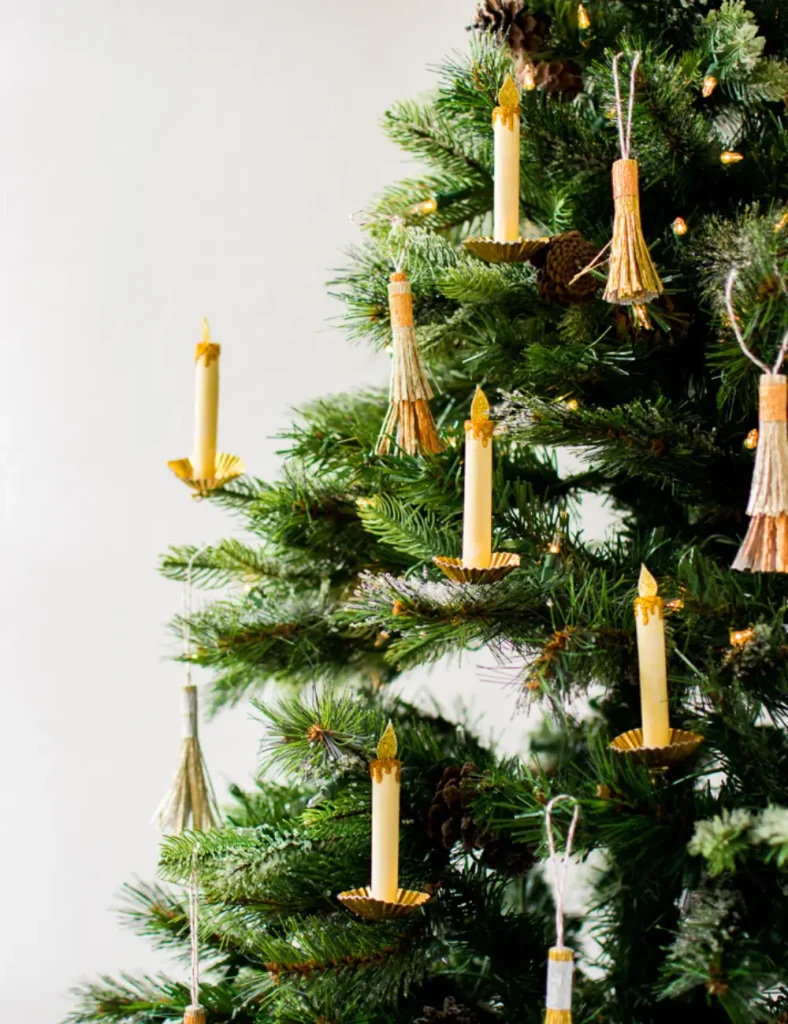
- Materials: gold or copper foil baking cups, textured paper, fine glitter, glue stick, hot glue, small gold clips
- Time per unit: 10 to 15 minutes
- Differentiator: sell in sets of six or twelve, since one candle on a tree looks like an accident
A paper homage to the Scandinavian clip-on candle, all the vintage charm with none of the open flame.
Materials cost almost nothing (foil cups come 150-300 a pack), and they weigh nothing to ship, which is rare on this list.
One warning worth heeding before you sell any: a reader reported the candles popping off their clips after two weeks, because hot glue doesn’t bond well to foil.
Glue a paper disc to the base first and fix the clip to that.
7. Wood Bead Snowflakes
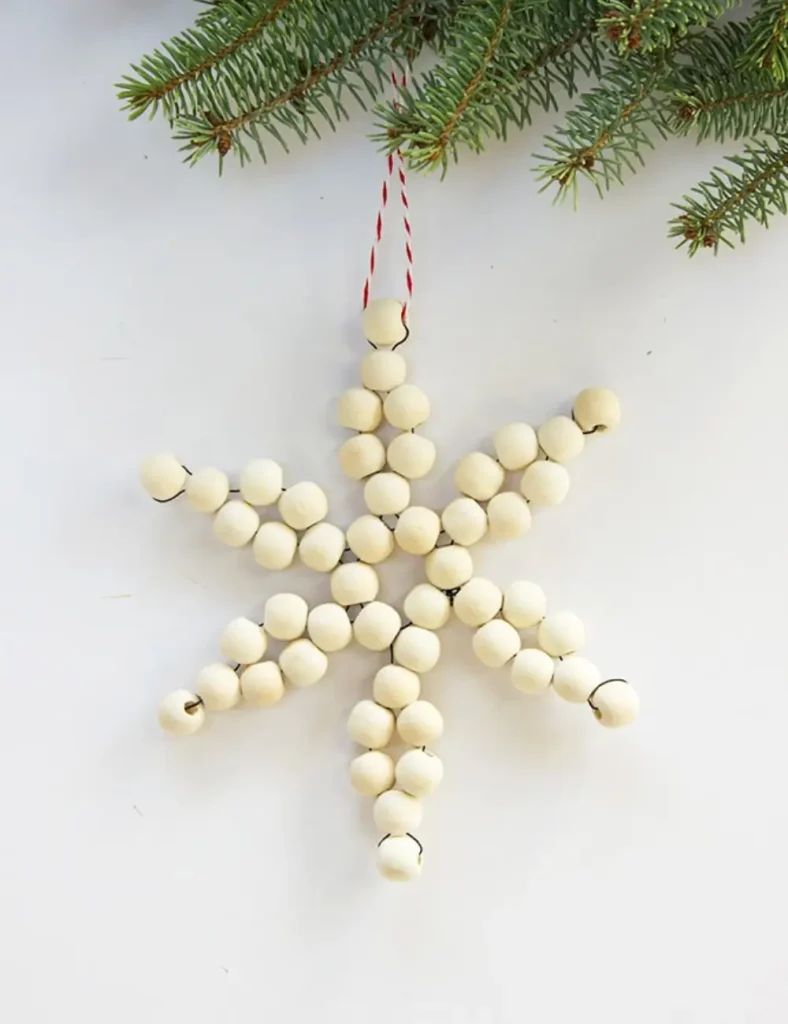
- Materials: wood beads (around 48 per snowflake), floral wire, clippers
- Time per unit: 20 to 30 minutes
- Differentiator: list them as winter decor rather than Christmas, so they keep selling into February
Two materials, no paint, no drying, no mess!
Pure assembly, which means you can make these on the sofa in front of something undemanding, and they’re the best shipper here: light, flat-ish, and essentially unbreakable.
The neutral Scandi look is the real commercial advantage, since a wood snowflake isn’t obviously Christmas and sells happily as winter decor once December’s gone.
Trim and tuck your wire ends properly, because a poke from a stray end is a one-star review.
8. Tinsel Ornament Piñatas
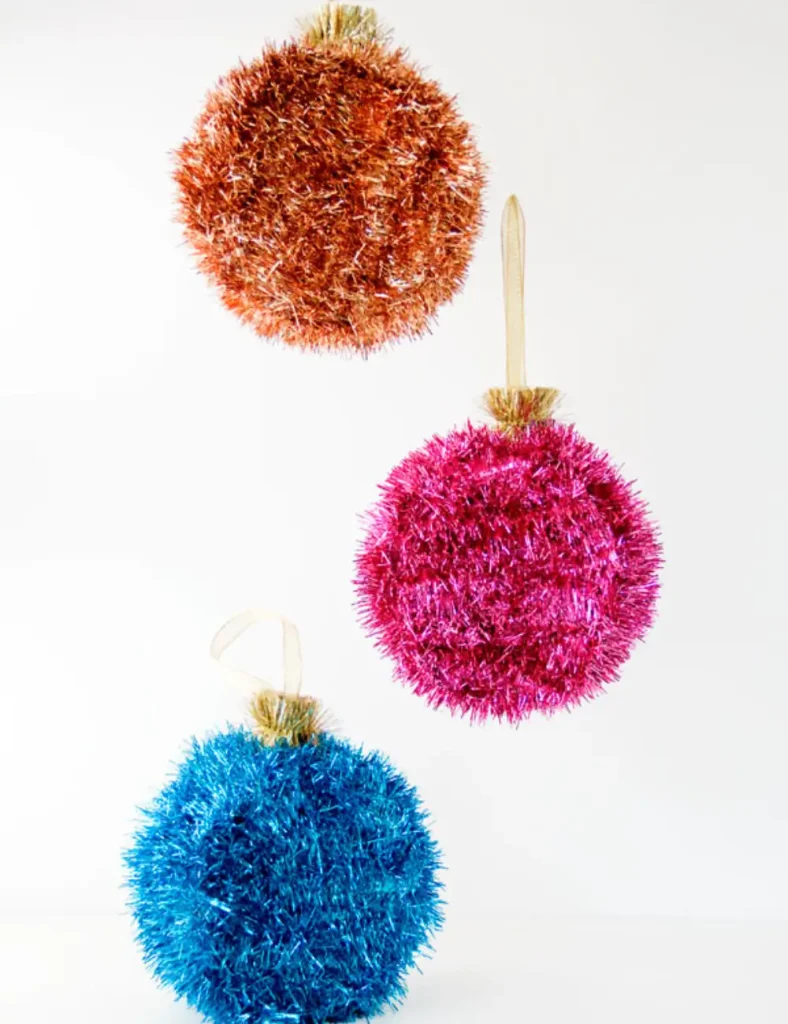
- Materials: poster board or cardboard, thin tinsel garland, gold tinsel, masking tape, hot glue, ribbon, an awl
- Time per unit: 45 to 60 minutes
- Differentiator: sell them empty as party decor and let the buyer add the sweets
Not a tree ornament, and pricing it as one would be a mistake.
This is a party product, which is a better-paying market: holiday party decor, favors, an advent alternative.
Materials cost almost nothing, though gluing tinsel on line by line is slow and mildly hazardous to your fingertips. Ship empty, always.
Filled means weight, melted candy, and allergen headaches you don’t need, and an unfilled piñata with a hatch is an easier sell anyway.
9. Paper Plate Snow Globe Kits
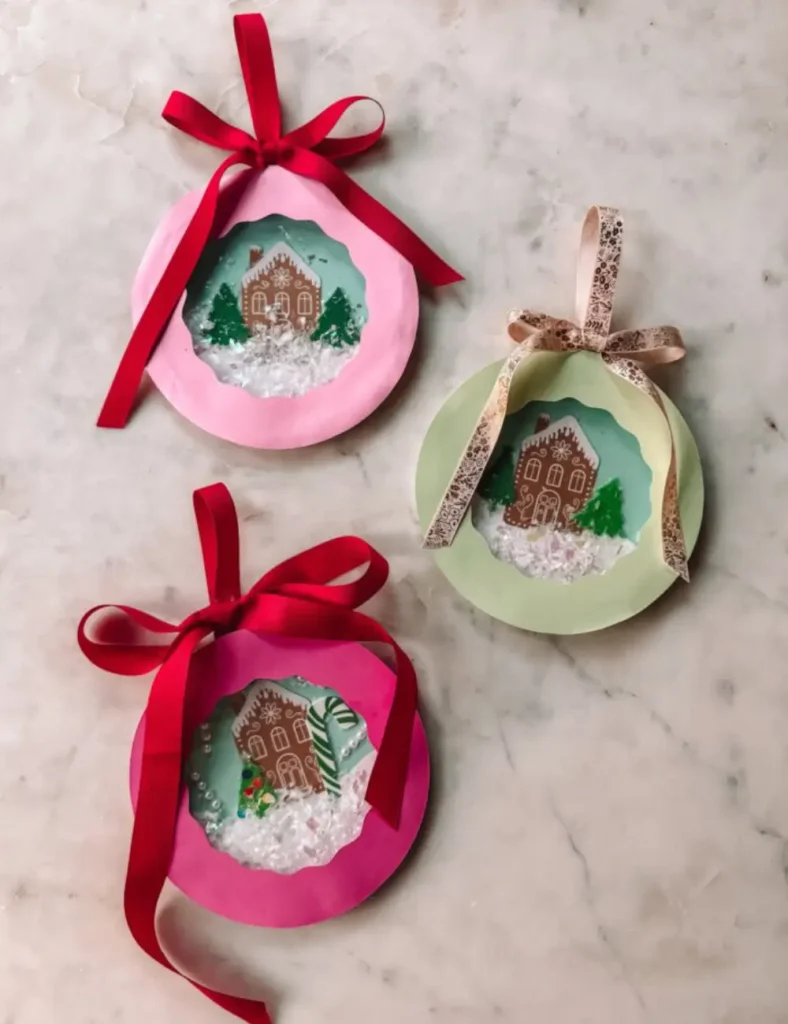
- Materials: small paper plates, cardstock, green felt, dot stickers, cellophane, iridescent confetti snow, ribbon, hot glue
- Time per unit: 20 to 30 minutes assembled, much less as kit prep in batches
- Differentiator: sell bulk class packs to teachers, scout leaders and party hosts
Nobody is buying a finished paper plate at a craft fair, so don’t try.
What people do buy is twenty of something pre-cut and bagged, in early December, in a mild panic, for a class of eight-year-olds.
Cut the cardstock shapes, portion the snow into sachets, bag the stickers, add instructions. Make your own templates, though.
Selling a kit built on someone else’s free download is a copyright problem.
10. Hand-Lettered Wood Slices
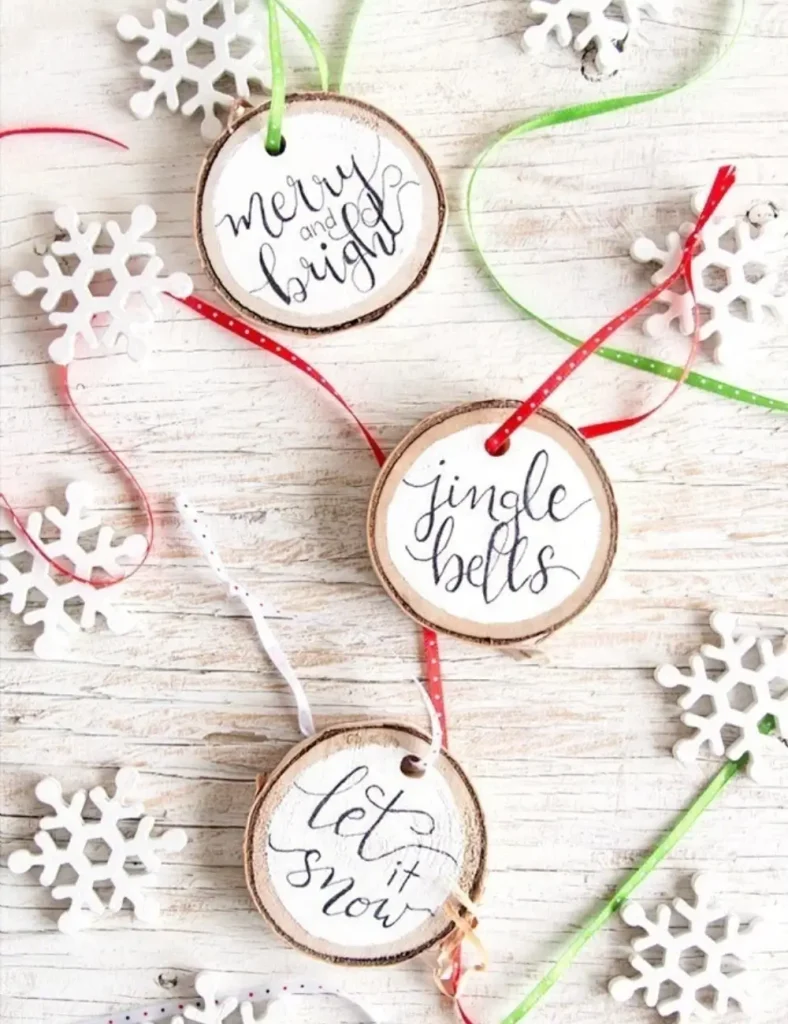
- Materials: pre-drilled wood slices, craft chalk paint, graphite transfer paper, fine-tip permanent marker, ribbon, Mod Podge or sealer
- Time per unit: 10 to 15 minutes once a batch is painted
- Differentiator: this is the one worth personalizing, with names, dates and “first Christmas”
Rustic wood slices are an enormous evergreen category, and this is the entry where custom work actually pays.
Personalized ornaments command two or three times the price of plain ones, and at ten minutes a unit the admin doesn’t eat your margin the way it would on something slower.
Graphite transfer paper means you don’t need good handwriting, just a steady hand tracing.
Seal them, though: marker on raw wood bleeds and fades.
11. Upcycled Paper Roll Poinsettias
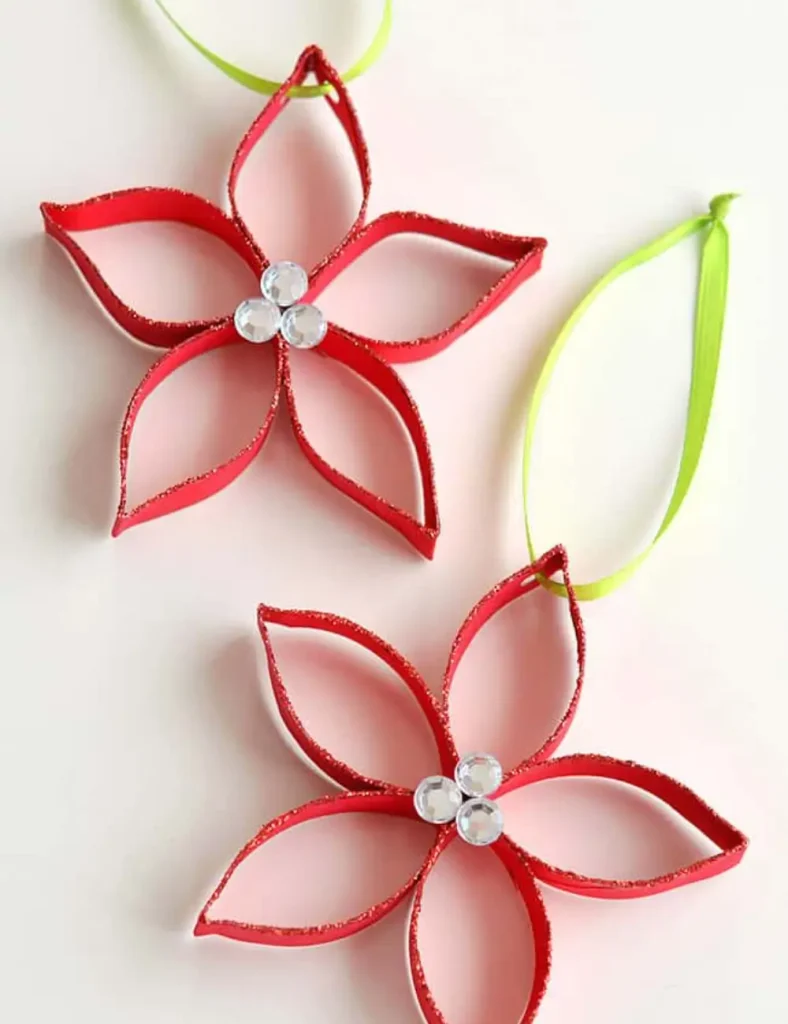
- Materials: toilet paper rolls (or red cardstock), red acrylic paint, white glue, red glitter, rhinestones, green ribbon, hole punch
- Time per unit: around 15 minutes active, plus overnight drying
- Differentiator: market it as plastic-free upcycled decor, which is its own Etsy search
Highest margin on this list, since the main ingredient is something you’d otherwise throw away.
Lean into that rather than hiding it: upcycled and plastic-free is a real buying motivation, and it pairs nicely with eco-friendly gifts.
Two adjustments if you sell them. Swap the plastic rhinestone center for paper or wood, or the eco claim falls apart. And seal the glitter, or every parcel you post arrives with a small festive crime scene inside.
12. Filled Baubles with Printed Ribbon
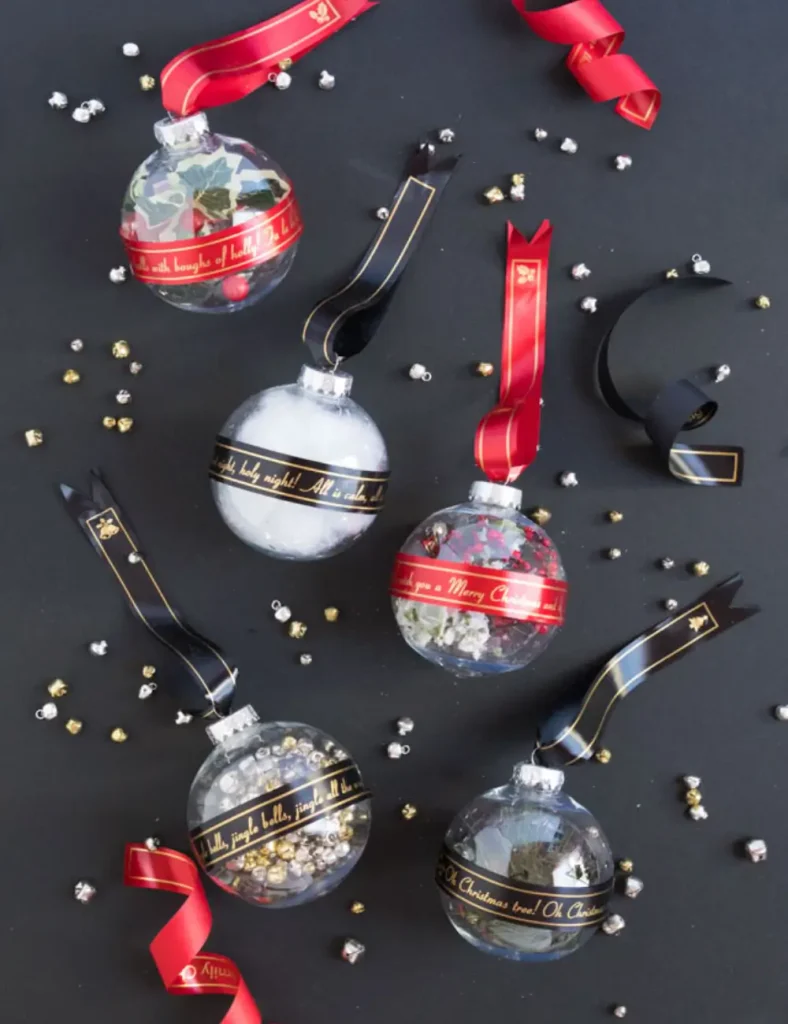
- Materials: clear plastic fillable ornaments, a ribbon and tape printer with satin cartridges, quick-dry craft glue, fillers like jingle bells, faux berries or greenery
- Time per unit: around 10 minutes
- Differentiator: personalization that scales, since you type it rather than hand-letter it
The equipment cost is real, but this is the entry where custom orders stop being a bottleneck.
Type a name, print a ribbon, wrap, done. No handwriting, no proofs, no wobbly letters at 11pm. Use quick-dry craft glue rather than hot glue, which leaves bumps under satin.
One legal note that matters: stick to public domain lyrics like Jingle Bells. Printing modern Christmas song lyrics on something you sell is straightforward infringement.
13. Unicorn Wood Slice Ornaments
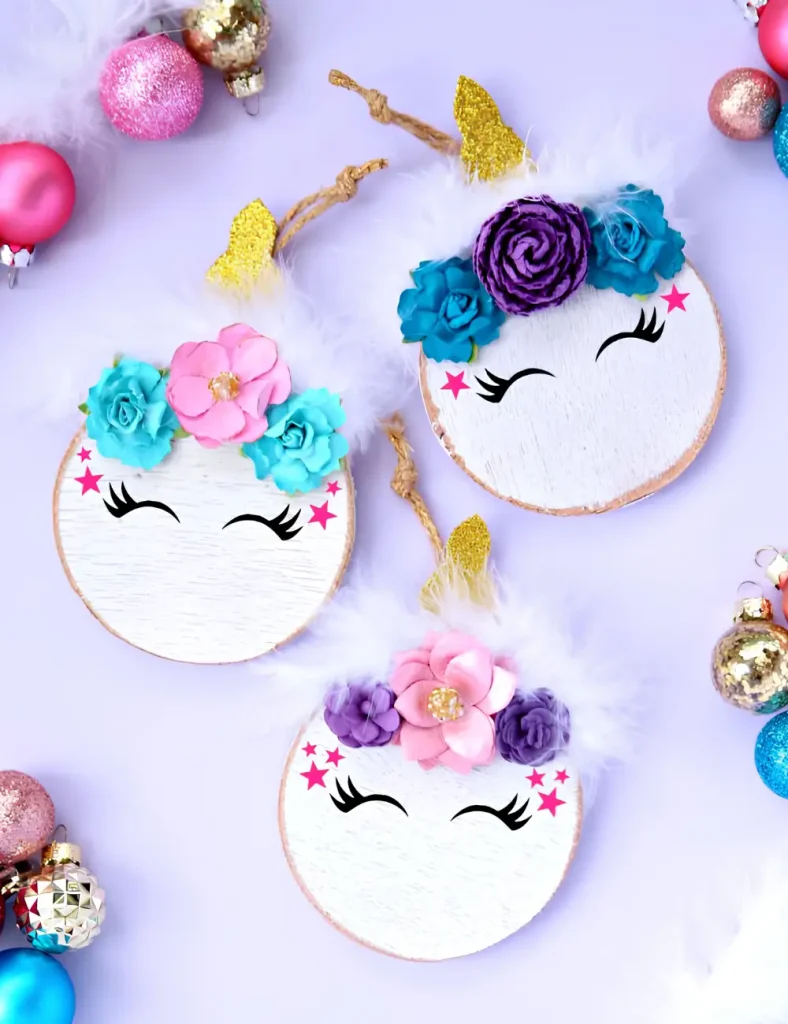
- Materials: white-painted wood slices, feather boa, glitter foam, paper flowers, vinyl or paint pens, jute rope, hot glue
- Time per unit: 10 to 15 minutes
- Differentiator: treat it as a format, not a design, and swap the animal to suit the market
The only entry here aimed at children, which is a market nothing else on this list touches: kids’ bedroom trees, teacher gifts, stocking fillers.
Lower price point, higher volume, less fussy buyers. The unicorn is optional. The same build (wood slice, mane, ears or horn, face) works as a reindeer, a highland cow, a fox, a bear, whatever’s current this year.
One warning: feather boa sheds, so seal the glue line properly.
14. Layered Felt Shapes
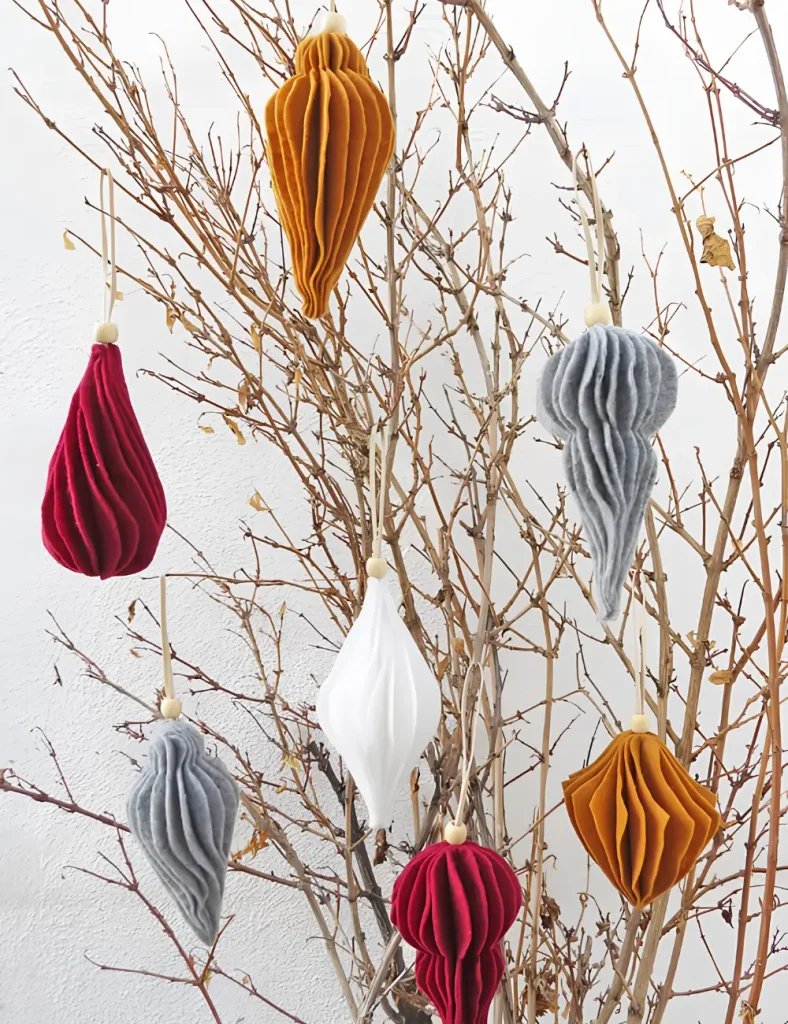
- Materials: felt in assorted colors, thread, needle, sharp scissors, ribbon or suede cord, wooden beads, sewing clips
- Time per unit: around 15 minutes
- Differentiator: market them as shatterproof, for homes with toddlers, cats, or both
Ten identical felt shapes stacked, stitched down the middle, then fanned out for volume.
Modern, Scandi, and the best economics on this list: they weigh almost nothing, stack completely flat, and cannot break in transit, which matters enormously when postage is eating a low-price item’s margin.
The cutting is the entire job, so cut in bulk before you stitch anything. Draw your own simple shapes rather than buying a pattern, since pattern licenses rarely cover selling finished goods.
15. Salt Dough Ornaments
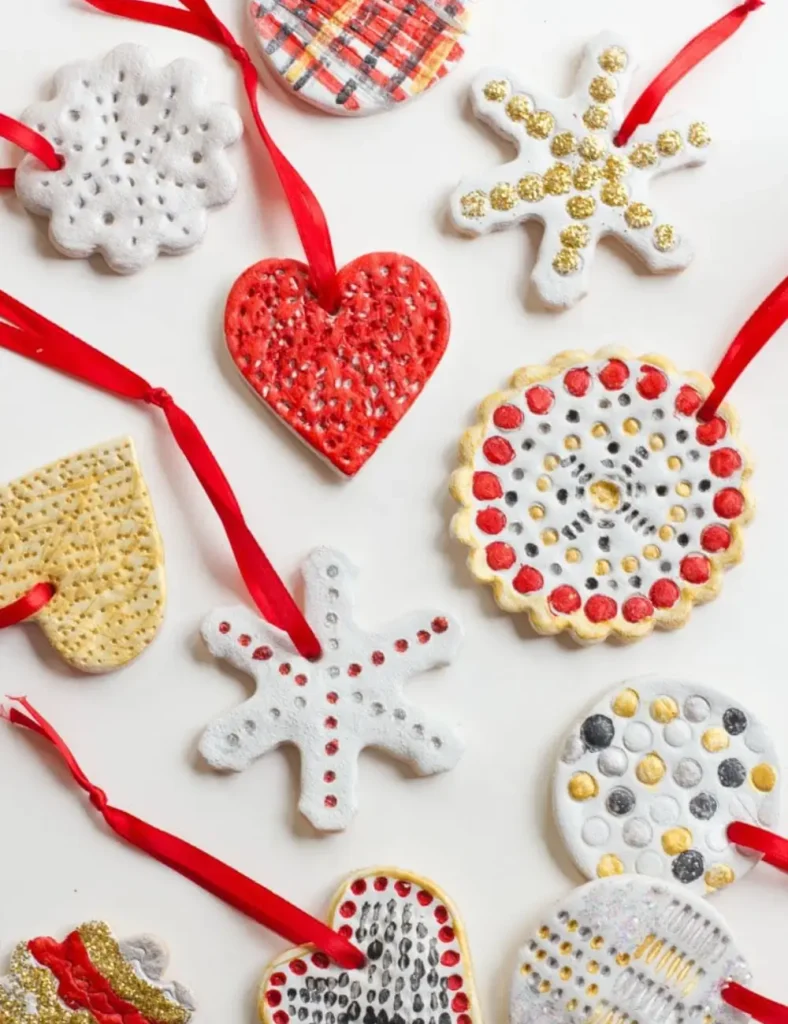
- Materials: flour, table salt, water, cookie cutters, acrylic paint, glitter, polyurethane spray or Mod Podge, ribbon
- Time per unit: minutes each in a batch of thirty, plus one to two hours baking
- Differentiator: materials cost nothing, so your finish is the entire product
Four cups of flour and a cup of salt makes about thirty ornaments.
Nothing else here comes close on cost, which changes what you’re actually selling: the dough is free, so the price is your painting and your finish.
It also makes this the cheapest craft to experiment with before committing to pricier materials.
Two warnings. Bake at 200°F, not higher, since plenty of people have had batches puff and lose their shape. And never sell one unsealed, because salt dough is essentially bread and will take on damp in a loft
16. Confetti Decoupage Baubles
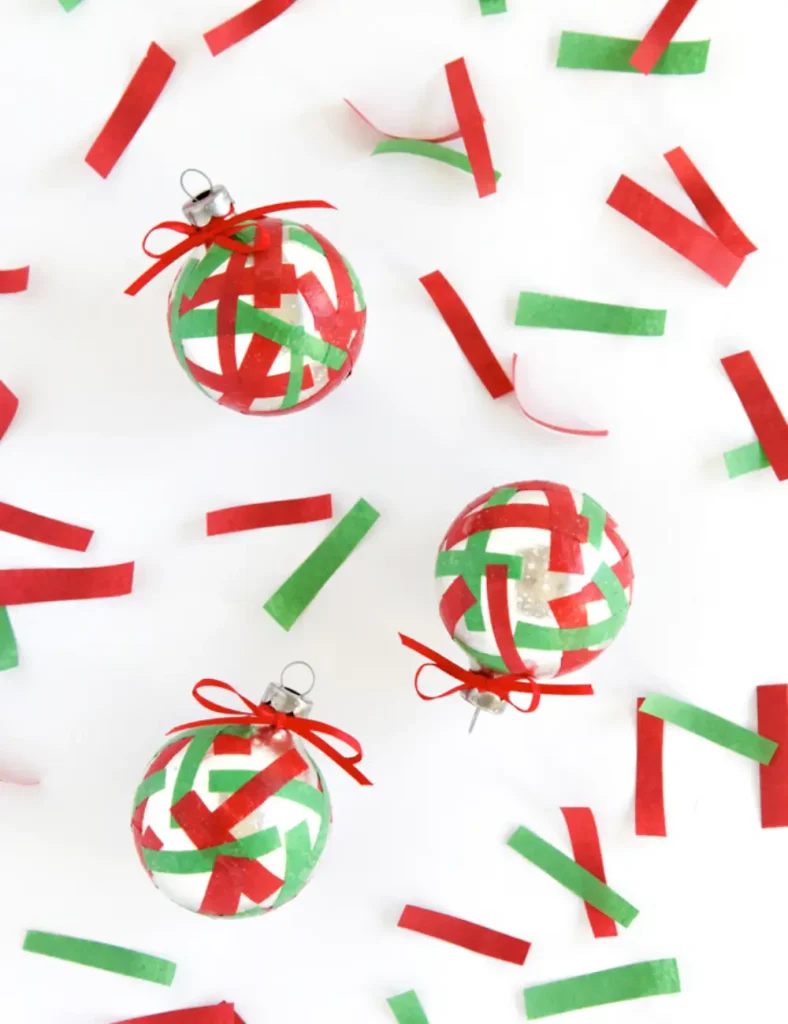
- Materials: plain or tarnished glass baubles, Mod Podge Matte, tissue paper, foam brush, thin red ribbon
- Time per unit: around 10 minutes, working one side at a time
- Differentiator: source thrifted baubles in job lots, so your material cost is close to nothing
This is the one where sourcing is the whole margin.
Charity shops and car boot sales are full of dated, tarnished baubles nobody wants, sold by the boxful for pennies, and a few strips of tissue paper turn them into something people will pay for.
Sort your job lot ruthlessly first, since chips and dents show straight through the decoupage. Seal thoroughly, work one side at a time so it doesn’t stick to the table, and pack carefully because it’s glass.
17. No-Sew Felt Donuts

- Materials: craft felt sheets, polyfill, hot glue, scissors, twine, yarn or mini pompoms for sprinkles
- Time per unit: 20 to 30 minutes
- Differentiator: it isn’t only an ornament, so list it as a soft toy, pincushion and decoration
Two felt circles, glued, stuffed, then topped with a wavy felt glaze and yarn sprinkles.
Fun to make, genuinely charming, and unbreakable.
The commercial argument is that it isn’t season-locked: the same object sells as a baby-safe soft toy, a pincushion for the sewing crowd, or year-round kitsch decor, which means your listing keeps working past December.
The inner circle is fiddly, and the tutorial admits it, so budget more time than you think.
18. DIY Resin Holiday Gift Tags
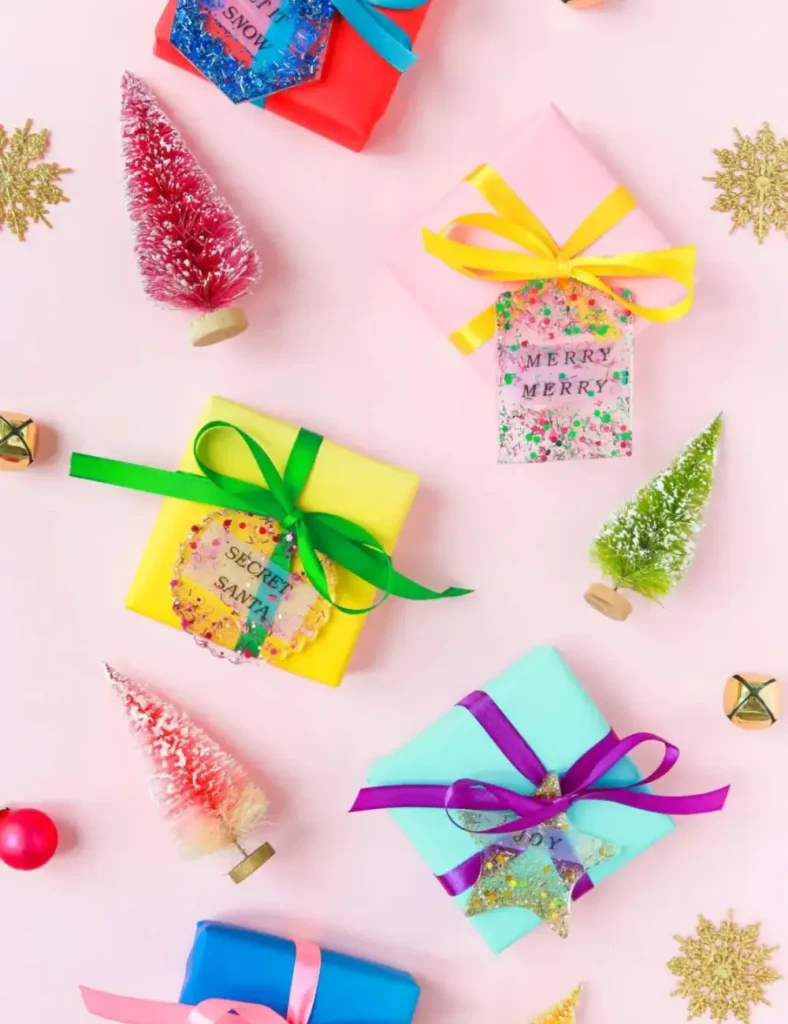
- Materials: silicone gift tag mold, resin, printed ribbon, gloves, glitter or confetti
- Time per unit: minutes to pour, 24 hours to cure
- Differentiator: one mold gives you perfectly identical units, so the listing photo always matches
The opposite of the marbled baubles: every tag comes out the same, which makes for a clean, repeatable Etsy listing and easy restocking.
Pour, embed the ribbon face down, cure overnight.
Two serious cautions. Resin is a skin sensitizer, and repeated exposure can cause a permanent allergic reaction, so gloves and real ventilation are non-negotiable if you’re making hundreds.
And the 24-hour cure means your production calendar starts a day earlier than you think.
19. Decorative Tinsel Christmas Tree Letters
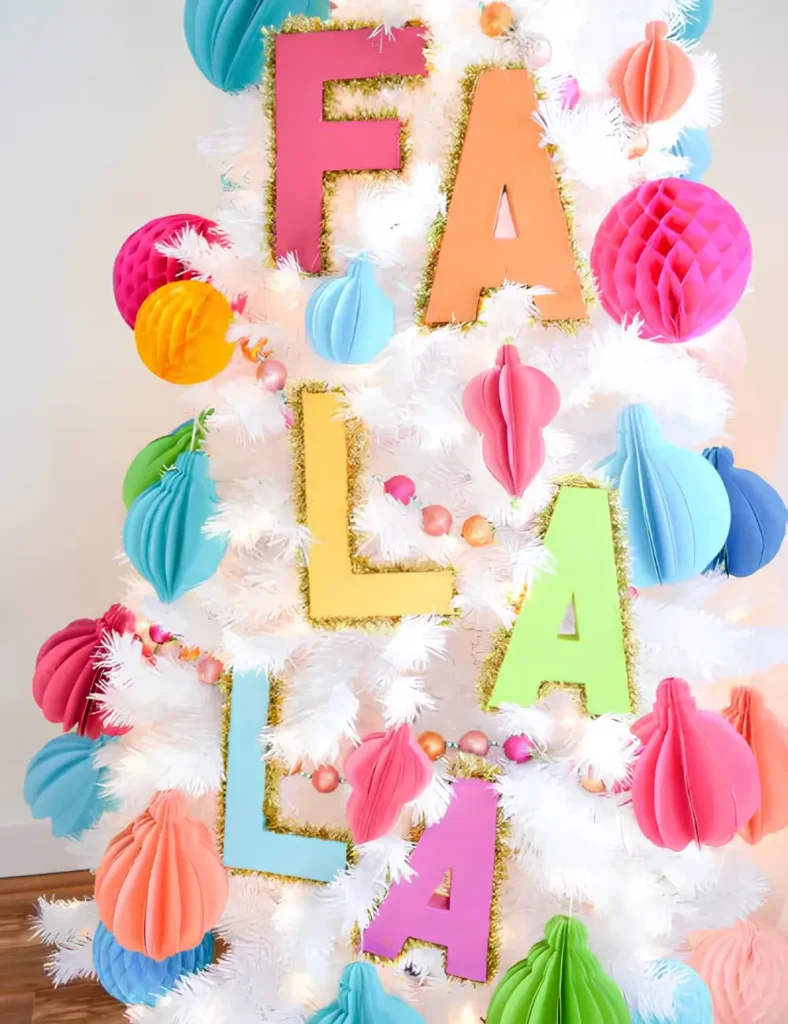
- Materials: cardboard letters, craft or spray paint, thin tinsel garland, hot glue, ribbon
- Time per unit: about an hour for a short word
- Differentiator: price per letter, so the customer’s word determines the order value
Not an ornament exactly, more a tree or mantel decoration, and that’s the commercial advantage.
Sell it per letter, and a customer spelling out a family name spends four times what someone buying “JOY” does, with no extra listing work from you.
It’s also made-to-order by nature, so you hold no stock. Bulky to post, though, so measure a boxed set before you promise free shipping
20. DIY Mini Glittered House Ornaments
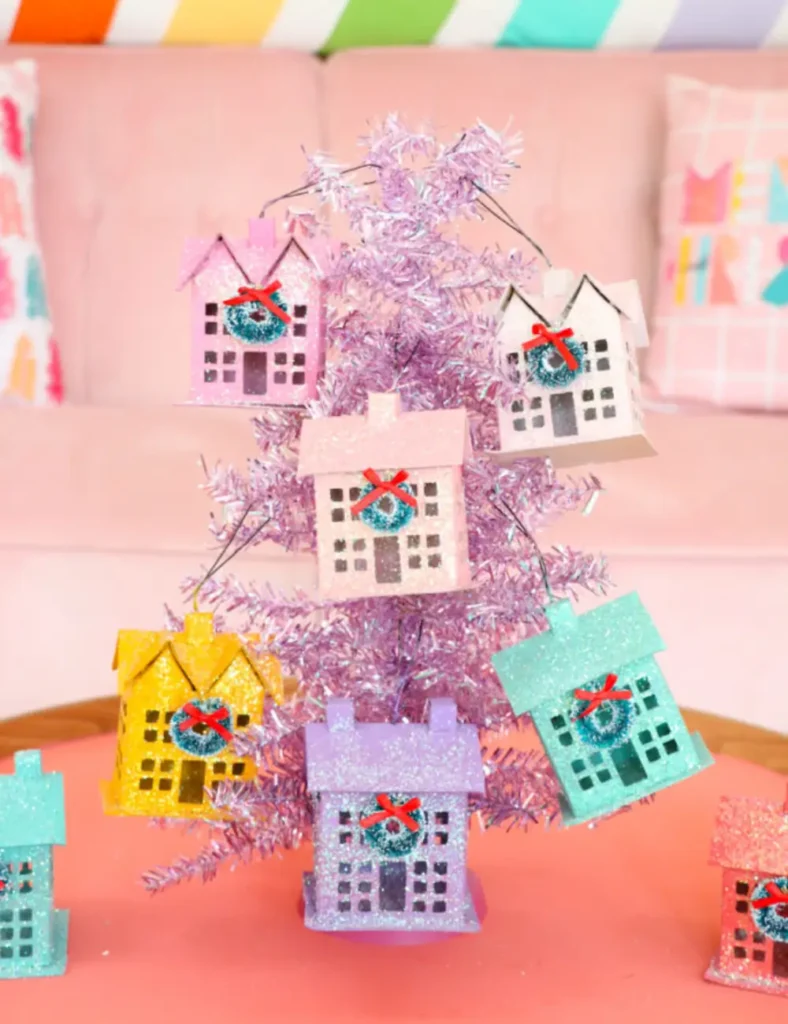
- Materials: paper mache house ornament blanks, spray paint, iridescent glitter, mini wreaths, hot glue
- Time per unit: a couple of minutes each in a batch
- Differentiator: the highest throughput on this list, with essentially no skill required
Spray the house, throw glitter at it while the paint is wet, glue on a tiny wreath. That’s the whole craft.
The wet paint does the gluing for you, which means you can line up fifty blanks on a dust sheet and finish the lot in an afternoon.
If you have no confidence in your craft skills and want volume rather than artistry, start here. Color choice is the only real decision you make.
21. DIY Multicolored Pom Pom Ornaments
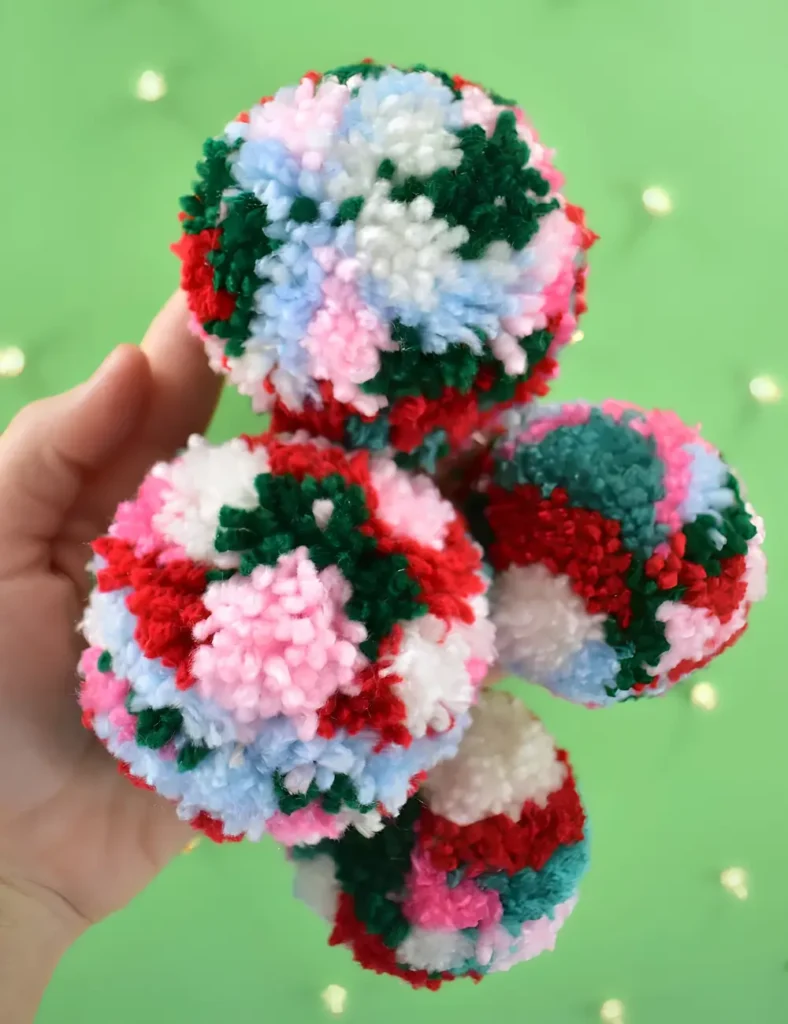
- Materials: yarn in several colors, pom-pom maker, very sharp scissors, long metal ornament hooks, needle-nose pliers
- Time per unit: 10 to 15 minutes
- Differentiator: check what retail charges before you price, because the gap is enormous
This is the entry that teaches the most useful habit on the list.
Anthropologie sells pom-pom ornaments at around $24 for a set of three, and six skeins of cheap acrylic yarn costs roughly the same and makes dozens.
Look up what a high-street brand charges for the thing you’re making, then price with that number in view rather than guessing. Sharp scissors matter more than you’d expect.
22. Pinecone Ornaments
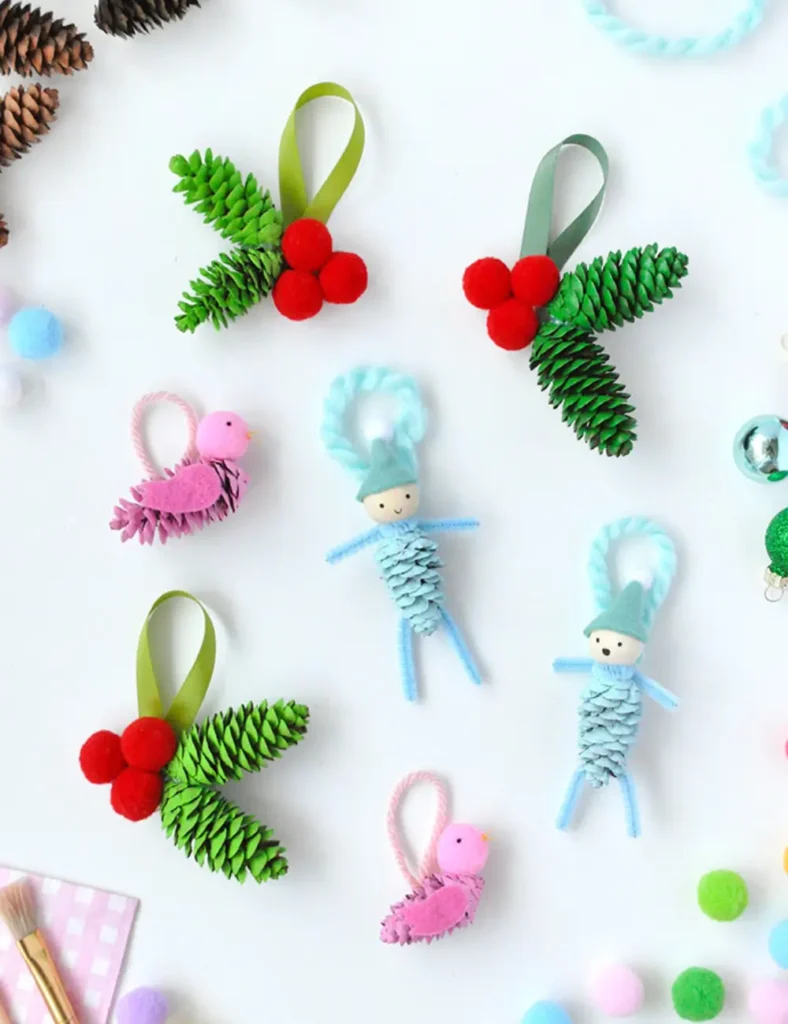
- Materials: mini pinecones, acrylic paint, pom poms, pipe cleaners, felt, wooden beads, ribbon, hot glue
- Time per unit: 15 to 20 minutes
- Differentiator: free foraged materials, if you process them properly first
The cheapest raw material of all, since it’s lying on the ground.
But before you sell a single one, bake your pinecones on a low oven for a couple of hours on foil.
They arrive full of sap and, more often than you’d like, small insects, and neither belongs in a customer’s home. It also opens them out nicely.
Check restrictions before shipping plant material internationally.
How to Price Handmade Ornaments Without Losing Money
Most handmade sellers underprice, and most of them do it the same way: they add up their materials, double it, and call that a price.
That formula ignores the two things that actually cost you money, which are your time and Etsy’s cut.
Here’s the arithmetic on a $20 ornament sold on Etsy in the US:
- Listing fee: $0.20
- Transaction fee at 6.5%: $1.30
- Payment processing at 3% plus $0.25: $0.85
- Total fees: $2.35, leaving you $17.65
Now subtract materials. Say $3. You’re at $14.65. Then subtract packaging, which people always forget: a box, tissue, a tag, a mailer, maybe $1.50. Now you’re at $13.15.
If that ornament took you 30 minutes, you just earned about $26 an hour before tax, which is decent. If it took 90 minutes, you earned $8.75 an hour, which is not.
So work backwards instead.
Decide what your hour is worth, time yourself honestly making three units (not one, and not the first one), then build the price from materials, plus time, plus packaging, plus roughly 12% for fees.
Add margin on top of that, not instead of it.
Two more things to build in.
If your sale comes through Etsy’s Offsite Ads, that can take up to another 15%, and above a certain sales threshold, you can’t opt out.
And if you’re selling at craft fairs, your stall fee needs spreading across everything you expect to sell that day, not treated as a separate sad expense.
The pom-pom entry above is the useful habit in miniature: look up what a high-street brand charges for the same thing before you decide what you’re worth.
When to List Christmas Ornaments
Earlier than feels reasonable. This is the single most common mistake.
Etsy shoppers start searching for Christmas in September, and the platform needs time to work out where a new listing belongs.
A listing published in November has no view history, no sales, and no relevance data, which means it sits below listings that have been quietly accumulating all autumn.
You are not just competing on product, you’re competing on how long the listing has existed.
A workable calendar:
- July and August: make your samples, test your times, photograph everything. Also check craft fair applications, since many close months ahead and the good ones fill fast.
- September: list. All of it. Even if you only have a few units made, get the listings live and gathering data.
- October: restock, add variations, start pinning.
- November: peak. Most of your sales happen in a three-week window from mid-November.
- Early December: last shipping dates approach fast. Publish yours clearly and stop taking custom orders well before them.
- Late December: switch to selling next year’s stock at a discount, or stop.
If you’re reading this in November, list anyway. Something is better than nothing, and the listing will be seasoned by next year.
Where to Sell: Etsy, Craft Fairs and Local Markets
Etsy is the obvious answer, and it isn’t always the best one.
Etsy suits small, light, repeatable items with a clear search term. The audience arrives already wanting to buy handmade, which is worth a lot. Downsides: fees, enormous competition, and you’re renting the relationship with your customer rather than owning it.
Craft fairs and Christmas markets suit anything bulky, fragile, or expensive to post, and anything where seeing the craftsmanship justifies the price. The giant finials and the plastic canvas frames belong here. You’ll also sell in volume in a single day, take payment instantly, and get direct feedback on which designs people pick up. Downsides: stall fees, a full day of your time, weather, and needing enough stock to fill a table.
Facebook Marketplace and local groups cost nothing, involve no fees, and work well for larger items and collection-only sales.
Instagram and Pinterest aren’t shops so much as feeders. Pinterest in particular behaves like a search engine for exactly this kind of product, and pins made in September are still working in December.
Consignment in a local shop takes a cut and moves slowly, but it gets your work in front of people who would never search for it.
Most people who do well use two or three of these rather than betting on one.
What You Can’t Legally Sell
This is where the enthusiasm meets the paperwork. I’m not a lawyer, so treat this as a list of things to look into rather than legal advice.
Anything trademarked or copyrighted. Cartoon characters, film and TV properties, sports team logos, brand names, and emoji artwork. This is the single fastest way to have listings pulled and a shop suspended, and “but everyone else is doing it” is not a defense. Ornaments are one of the most heavily policed categories on Etsy for exactly this reason.
Modern song lyrics. “Jingle Bells” is public domain. Anything written in the last century probably isn’t.
Fonts you don’t have a commercial license for. A great many free fonts are personal use only, and the license lives in the file you downloaded.
Patterns and templates you bought or downloaded free. Buying a pattern rarely gives you the right to sell finished items made from it. Some designers explicitly allow small-scale sales; many don’t. Check, and when in doubt draw your own shapes.
Products aimed at children, without checking safety rules. This one catches people out. In the US, anything designed or marketed for children under 12 counts as a children’s product and carries testing and labeling obligations under CPSIA. Small parts are a choking hazard. The kids’ character ornaments and the craft kits are the entries to think hardest about here.
If you’re selling at fairs, look into public liability insurance too. Many organizers now require it as a condition of booking.
Making Ornaments in Bulk Without Losing Your Mind
The difference between a nice hobby and something that pays is almost entirely process.
Batch by stage, not by item. Never make one complete ornament, then another. Cut fifty. Then paint fifty. Then assemble fifty. Every time you switch tools or tasks you lose minutes, and across a hundred units that’s a full day.
Time yourself properly. Not the first one, which is always slow, and not your best one. Make three, take the average, and use that number for pricing. Most people’s real time per unit is roughly double their guess.
Prep the boring parts on bad days. Cutting felt, sanding wood slices, portioning kit components. None of it needs creative energy, and having a box of prepped components means a good hour can go straight into finishing.
Test before you commit. Make five; list them, and see what happens. Making two hundred of something nobody wants is a genuinely miserable experience, and it happens every single year.
Sort out packaging early. Order your boxes, mailers, and tissue in September, not the week you get your first order. Work out your postage costs before you set prices, especially for anything bulky.
Set a stopping rule. Decide in advance how many hours a week this gets, and stop when you hit it. December has a way of eating everything you let it.
Frequently Asked Questions
Personalized ornaments outsell almost everything else, particularly first Christmas, family names, new home, and pet keepsakes. Beyond that, anything that photographs well and reads as expensive relative to its price.
Neutral Scandi and wood tones remain strong, along with a broad retro and nostalgia revival covering plastic canvas, tinsel, and mid-century shapes. Personalization is a category rather than a trend, and it doesn’t seem to be going anywhere.
Around $10 in total: 6.5% transaction fee, plus 3% and $0.25 in payment processing, plus the $0.20 listing fee. Offsite Ads can add up to 15% more on sales that come through them.
Yes, and the season is short and intense. Most of the year’s sales happen between mid-November and mid-December, which is why listing in September matters so much.
It depends entirely on where you live and how much you make, and it’s worth a proper look rather than a guess. Most places treat casual selling differently from a registered business, and the threshold varies.
Fewer than you think. Five of each design, listed, will teach you more than two hundred sitting in a box.
ALSO WORTH A LOOK: